Why a Simple Grey Card Might Be the Most Powerful Tool in Your Camera Bag
- Kari kari@socialphoto.com
- Feb 4
- 3 min read


When people think about improving their photography, they usually jump straight to new cameras, better lenses, or fancy lighting gear. But one of the most powerful tools I use regularly costs less than a memory card and fits in my pocket:
A grey card.
Most photographers know grey cards as a way to set custom white balance — but that’s only half the story. Used correctly, a grey card can also help you dial in accurate exposure at the same time. Two problems solved with one simple tool.
Let’s break it down.
What a Grey Card Actually Does (Beyond White Balance)
A grey card is designed to reflect 18% neutral grey, which is the midpoint your camera’s light meter is calibrated around. That neutrality is the key.
When you photograph a grey card under the same light as your subject, you’re giving your camera (and your editing software) a known reference point — not just for color, but for brightness.
That means:
No color casts
No guessing
No “why does this look different on every screen?”
Just clean, repeatable results.
Setting Custom White Balance the Right Way
The most common use of a grey card is setting custom white balance — especially important in mixed or artificial lighting (hello, offices).
Here’s the simple workflow:
Place the grey card where your subject will be, facing the light source.
Take a photo of the card filling most of the frame.
Use that image to set custom white balance in-camera or as a reference in post.
This gives you consistent, neutral skin tones — which is critical for corporate headshots where accuracy matters more than mood.
The Part Most People Miss: Grey Cards Also Reveal Proper Exposure
Here is the underrated magic.
When you photograph a grey card and check your histogram:
The exposure of the card should land right around the middle of the histogram
Not clipped on the highlights
Not crushed into the shadows
If the grey card is too bright → you’re overexposed
If it’s too dark → you’re underexposed


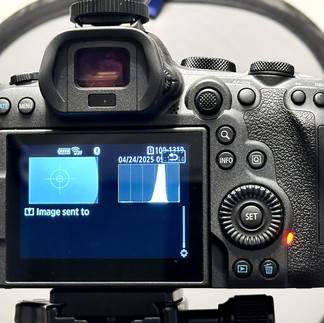


Once the grey card is properly exposed, your subject will be very close to correct exposure as well — especially for faces.
This is incredibly useful when:
Shooting against white or dark backgrounds
Working in unfamiliar office lighting
Training non-photographers to get consistent results
Bonus - you do not need a light meter to nail exposure!
Why This Matters for Corporate Headshots
Corporate headshots don’t need dramatic lighting tricks — they need:
Accurate skin tones
Consistent exposure
Clean, professional results across many people
A grey card removes guesswork and speeds everything up. Whether you’re shooting with strobes, continuous light, or window light, it gives you a fast baseline you can trust.
This is exactly why I teach it as a foundational step.
The Grey Card I Personally Use
This is the grey card I use and recommend because it’s reliable, durable, and easy to work into a professional workflow:

No gimmicks. Just a solid reference that does its job every time.
Want More Practical, No-Fluff Tips Like This?
This grey card technique is just one of many simple, professional tricks I teach in The Corporate Headshot Blueprint — my step-by-step ebook designed for people who need great headshots without being photographers.
Inside, I cover:
Simple gear setups that actually work
Camera settings explained clearly (no jargon)
Lighting setups for offices and small spaces
Posing guidance that makes people look confident and natural
Post-processing workflows that save time and money
If you’re responsible for creating headshots at work — or want to add this skill to your professional toolkit — this guide was built for you.
Sometimes the biggest upgrades don’t come from buying more gear — they come from using the right tool, the right way.


Comments